
We have all been there: scrolling endlessly through Pinterest or Instagram, mesmerized by flawless, intricate nail art, only to realize that achieving those looks usually requires a three-hour salon appointment and a hefty budget. The glossy, perfectly sculpted acrylics and hand-painted masterpieces are undeniably gorgeous, but they aren’t always practical for the everyday beauty enthusiast. The good news is that you absolutely do not need to be a licensed nail technician or spend a fortune to have beautiful, trendy hands.
The secret to a stunning manicure lies in knowing a few clever hacks and leaning into aesthetics that celebrate simplicity. DIY nail art has evolved dramatically, and today’s most popular trends are actually the easiest to recreate. From minimalist dots to nostalgic patterns that perfectly complement the latest Y2K fashion trends making a tropical comeback, there are countless ways to elevate your nails from your own couch. In this guide, we are breaking down 12 cute nail designs simple enough to do at home, proving once and for all that you don’t need professional skills to nail your next manicure.
What You Need for Easy At-Home Nail Art
Before diving into the designs, it is important to set up your workspace. You might assume that intricate nail art requires expensive dotting tools, ultra-fine detailing brushes, and professional-grade palettes. However, the reality is much more budget-friendly. Most of the tools you need to create flawless, aesthetic designs are already sitting in your bathroom cabinet or desk drawer.
By repurposing everyday household items, you can achieve the exact same precision and effects as the pros. The key is to look at your everyday objects differently. Once you realize how versatile these basic items are, you will never feel the need to buy specialized, single-use nail art kits again. For a deeper dive into professional-level prep, you can always check out Allure’s guide to painting your nails at home, but for the art itself, here is your DIY toolkit.
Bobby Pins & Toothpicks
Bobby pins are the ultimate unsung heroes of DIY nail art. When you pull the two prongs of a bobby pin apart, the little rounded metal tips at the ends become the perfect, uniform dotting tools. Because they are firm and have a smooth surface, they hold just the right amount of nail polish to drop a perfectly round circle onto your nail without dragging or smudging the base color.
Toothpicks serve a similar but distinct purpose. While bobby pins are great for large, uniform dots, toothpicks are your secret weapon for fine lines, tiny details, and dragging wet polish to create shapes like hearts or stars. Keep a small handful of both on your table; you will want fresh ones as the polish starts to dry and clump on the tips during your manicure session.
12 Cute Nail Designs Simple Enough to Do at Home
Now that your DIY toolkit is ready, it is time to get creative. The following designs have been carefully selected because they offer maximum visual impact with minimal technical effort. They are forgiving of mistakes, look fantastic on both short and long nails, and require no advanced artistic abilities.
Whether you are prepping for a beach vacation or just want to add a pop of color to your daily look, these tutorials will walk you through the process step-by-step. Let’s explore the best beginner-friendly aesthetics.
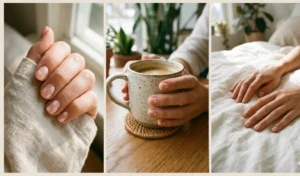
1. Minimalist Bobby-Pin Daisies
The floral daisy trend is a massive staple in the “Coconut Girl” aesthetic, and thankfully, it is also one of the easiest designs to master. You do not need to paint delicate petals or worry about symmetry. By using the bobby pin technique mentioned earlier, you can create adorable, uniform daisies in a matter of seconds.
How-To & Tools Needed: You will need a base color (sheer pink or nude works best), a white polish, a yellow polish, and a bobby pin. Dip the tip of the bobby pin into the white polish and stamp five dots in a small circle on your nail. These are your petals. Once they are slightly dry, clean the bobby pin, dip it into the yellow polish, and place one dot right in the center. The result is a perfect, retro-inspired daisy that looks incredibly chic.
2. The Foolproof Micro French Tip
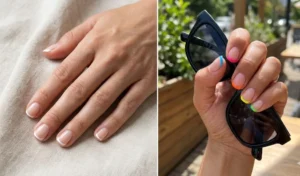
The French manicure is a timeless classic, but the modern update—the micro French tip—is much more delicate and, surprisingly, much easier to do yourself. A traditional thick French tip requires a very steady hand to get the “smile line” perfectly even across the nail. A micro tip, however, is just a whisper of color along the very edge, making it highly forgiving.
If you don’t have a viral silicone nail stamper, you can actually use your own thumb! Paint a small stripe of your tip color (classic white or a fun neon) onto the fleshy pad of your opposite thumb. Gently press the very tip of your nail into the wet polish on your thumb and rock it slightly from side to side. The polish will transfer perfectly onto the absolute edge of your nail, giving you a flawless, ultra-thin French tip.
3. Easy Y2K Smiley Faces
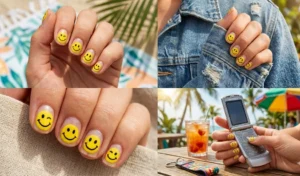
Nostalgia is dominating the fashion world, and smiley face nail art is the ultimate accessory for all your top Y2K Tropicalcore outfit ideas. They are fun, slightly quirky, and add a heavy dose of personality to your look. Best of all, because the Y2K aesthetic embraces a slightly chaotic, DIY vibe, your smiley faces don’t need to be perfectly symmetrical to look amazing.
Start with a bare nail or a clear base coat. Use your bobby pin to drop a large circle of bright yellow polish onto the center of your nail. Once the yellow is mostly dry, take your toothpick, dip it in black polish, and add two tiny dots for the eyes. Use the same toothpick to carefully drag a small curved line for the smile. Top it off with a glossy top coat, and you have instant, mood-boosting nail art.
4. “Skittle” Mismatched Pastels
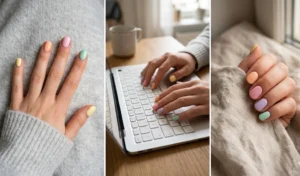
If you genuinely do not want to use any tools or attempt any drawing, the “Skittle” manicure is the perfect solution. Named after the colorful candy, this trend involves painting every single nail a different color. It sounds chaotic, but when you stick to a cohesive color palette—like soft spring pastels or autumnal earth tones—it looks incredibly intentional and stylish.
You will need five different colors of polish that share the same undertone or saturation level. Simply paint a solid, opaque layer of a different color on each finger. The art is entirely in the curation of the colors rather than the application technique. It is the easiest way to look like you put a lot of thought into your manicure without doing any actual nail art.
5. Tropicalcore Gradient Ombre
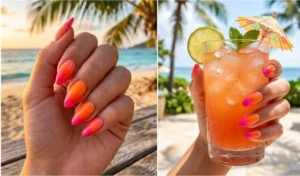
Nothing says summer vacation quite like a gradient sunset on your nails. The Tropicalcore gradient ombre mimics the seamless blend of a tropical sunset, fading from warm coral to bright orange or hot pink to deep purple. It looks like an advanced salon technique, but the makeup sponge hack makes it entirely foolproof.
You will need two contrasting but complementary polish colors, a makeup sponge, and some liquid latex or tape to protect the skin around your nail. Paint a stripe of both colors side-by-side on the sponge. Repeatedly dab the sponge onto your nail, moving slightly up and down to blur the line where the two colors meet. It will look messy at first, but once you apply a thick, glossy topcoat, the colors will melt together perfectly into a smooth gradient.
6. Negative Space Half-Moons
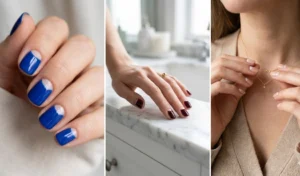
Negative space manicures are incredibly modern and have the added bonus of growing out beautifully. Because there is no polish right at the cuticle line, you won’t get that harsh, obvious ridge when your natural nail starts to grow. The half-moon design leaves a neat, unpainted semi-circle at the base of the nail, creating a bold, geometric look.
You will need paper ring reinforcement stickers (the kind used for binder paper) and your favorite bold polish color. Place a ring sticker over the cuticle area of your nail, leaving the top portion exposed. Press it down firmly. Paint the rest of the nail above the sticker. While the polish is still wet, carefully peel off the sticker with tweezers. You will be left with a crisp, perfect negative space half-moon that looks incredibly professional.
7. Classic Cherry Accents
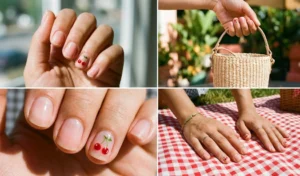
Fruit-themed nail art always makes a huge resurgence during the warmer months, and the classic cherry motif is by far the most iconic. It strikes the perfect balance between retro charm and modern playfulness, serving as the ultimate accessory for all your cute Y2K summer outfits. Instead of attempting to hand-paint complex fruit bowls, focusing on a single, stylized cherry on one or two accent nails keeps the manicure chic and completely manageable.
Start with a bare nail or a sheer pink base. Grab your trusty bobby pin and dip it into a bright, opaque red polish. Place two red dots side-by-side (but slightly staggered) near the center of your nail. Once the red is dry, take a toothpick dipped in green polish and draw a tiny “V” shape connecting the two dots to act as the stems. Add a tiny white dot on each cherry for a glossy highlight effect, seal it with a topcoat, and your retro fruit art is complete.
8. Fluffy Cloud Nails
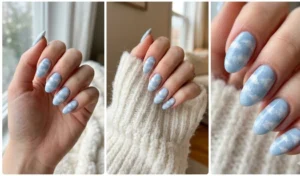
If you prefer a softer, dreamier aesthetic, fluffy cloud nails are an absolute must-try. This design gives your fingertips an ethereal, floating appearance that looks highly artistic but relies entirely on messy application. Because real clouds do not have hard edges or perfect symmetry, your nail art shouldn’t either, which takes all the pressure off achieving a “perfect” shape.
Apply a sky-blue or soft lavender base coat and let it dry completely. Tear a small piece off your makeup sponge and grip it with tweezers. Dip the torn, textured edge of the sponge lightly into white nail polish. Gently dab the sponge onto your nail in random, circular clusters. The textured edge of the sponge naturally diffuses the white polish, creating that wispy, cloud-like fade without any harsh lines.
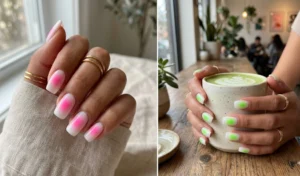
9. The Cheater’s Aura Nail
Aura nails have taken social media by storm, mimicking glowing, colorful energy fields radiating from the center of the nail. While professional nail technicians achieve this look using expensive airbrush guns to get a flawless circular fade, you can completely fake the effect at home. The DIY version yields a remarkably similar, trendy result that will fool everyone into thinking you just stepped out of a high-end salon.
Apply a sheer, milky white or light pink base coat. While the base is still slightly tacky, take a small makeup sponge and paint a circle of a bright, contrasting color (like hot pink, neon green, or deep blue) right in the center. Lightly dab the sponge onto the center of your nail. The sponge will deposit the most color in the middle while softly diffusing the edges outward. Apply a thick, glossy topcoat immediately to blur the transition even further.
10. Abstract Minimalist Swirls
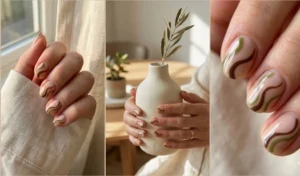
For a manicure that feels modern, sophisticated, and slightly avant-garde, abstract minimalist swirls are the way to go. The beauty of abstract art is that there is literally no right or wrong way to do it. Every curve, wiggle, and line looks entirely intentional. It is a fantastic way to experiment with color without committing to a rigid pattern.
You will need a neutral base color and one or two striking accent colors, along with a toothpick or a clean, fine-tipped eyeliner brush. Dip your tool into the accent color and lightly drag it across the nail in a sweeping, curved motion. You can start from the cuticle and swirl up to the tip, or just add a quick squiggly line across the side. Let your hand move naturally—the more organic and fluid the line, the better the final result will look.
11. DIY Chrome Finish
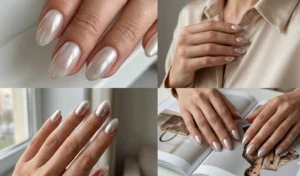
The high-shine, reflective chrome finish (often referred to as the “glazed donut” look) has completely dominated the beauty world. It gives nails a wet, metallic gleam that looks incredibly luxurious. While salons use specialized UV gel systems to rub the chrome powder into the nail, beauty enthusiasts have figured out a brilliant hack to get the exact same futuristic shine using regular nail polish. For more insights on this massive trend, Byrdie’s breakdown of the chrome nail craze explains exactly why this look is everywhere.
Paint your nails with any base color (white or sheer pink works best for a glazed look) and apply a regular glossy topcoat. Wait until the topcoat is almost dry—it should be firm but slightly tacky to the touch. Take a cheap sponge eyeshadow applicator, dip it into a loose cosmetic highlighter or affordable nail chrome powder, and rub it vigorously over the tacky nail. The powder will bind to the polish, creating a smooth, mirrored finish. Seal it immediately with a water-based topcoat to prevent the chrome from clouding.
12. Glitter Cuticle Fade
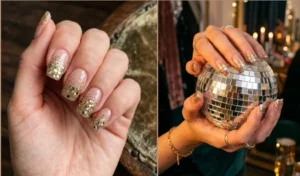
Bringing back the bold, glamorous energy of the early 2000s, the glitter cuticle fade is a low-effort, high-impact design. It leans perfectly into the flashy, unapologetic style of McBling outfits that bring Y2K back to life. The best part about this design is that chunkier, messier glitter actually looks better, making it the most forgiving nail art on this entire list.
Start with a bare nail or a nude base coat. Take a bottle of chunky glitter polish and wipe most of the polish off the brush. Dab the glitter heavily right at the base of your nail, near the cuticle. Without adding more polish to the brush, lightly drag whatever glitter is left upward toward the middle of the nail. This concentrates the sparkle at the bottom and creates a beautiful, fading starburst effect towards the tip.
3 Pro-Tips to Make Your DIY Manicure Last Longer
Spending time creating beautiful nail art at home is incredibly rewarding, but it can be quickly overshadowed by the frustration of premature chipping. When your manicure flakes off after just two days, it feels like all that effort went down the drain. Fortunately, making your polish last is entirely about your preparation and finishing steps.
By incorporating a few professional habits into your DIY routine, you can significantly extend the life of your nail art. These small adjustments take only a few extra minutes but will ensure your cute designs stay intact, glossy, and fresh for up to a full week.
Prep the Nail Plate Properly
The number one reason nail polish peels off in large sheets is because it was applied over natural oils on the nail plate. Before you even open a bottle of base coat, you must ensure your nails are completely clean and dehydrated. Even if you just washed your hands, the natural oils from your skin and soap residue can create a barrier that prevents the polish from adhering.
To prep like a pro, saturate a cotton pad with pure acetone or rubbing alcohol. Vigorously wipe down every single nail, making sure to push into the corners and along the cuticle line. This strips away all invisible oils and moisture, giving your base coat a dry, textured surface to grip onto tightly.
Cap the Free Edge
If you notice that your polish always starts chipping at the very tips of your nails first, you are likely skipping a crucial step: capping the free edge. The tip of your nail takes the most physical impact throughout the day—typing on keyboards, opening cans, and scratching surfaces all slowly wear away the polish at the edge.
To prevent this, after you apply your final layer of topcoat over the nail bed, gently swipe the side of the brush horizontally along the very edge (the tip) of your nail. This “caps” the raw edge with a protective seal of clear polish, effectively locking the color in and wrapping it around the tip so it cannot lift or chip as easily from daily wear and tear.
Reapply Top Coat Every Few Days
Your topcoat is the armor that protects your delicate nail art from the outside world. However, that armor slowly wears down, loses its shine, and becomes susceptible to micro-scratches every single day. You shouldn’t just apply topcoat on day one and forget about it.
To keep your DIY designs looking as fresh as the day you painted them, make it a habit to apply a thin, fresh layer of glossy topcoat every three to four days. This instantly revives the high-shine finish, smooths out any minor dents, and adds a brand new layer of protection against chipping, significantly extending the lifespan of your manicure.
Conclusion
Creating gorgeous, Instagram-worthy nails at home doesn’t require a professional license, a steady hand, or a massive budget. By rethinking how you use everyday household items like bobby pins and makeup sponges, you unlock a whole new world of creative possibilities. DIY nail art is all about personal expression and having fun with your look, not stressing over microscopic imperfections. The designs we covered today are proof that simplicity is often the most striking aesthetic.
Which of these 12 cute nail designs are you planning to try first? Are you leaning towards the dreamy cloud nails, or are you ready to test out the viral chrome hack? Let us know in the comments below! Don’t forget to save your favorite natural-looking manicure images from this post to your Pinterest boards for your next DIY pamper night. While your nails are drying, be sure to explore our latest style guides to piece together the perfect outfit to match your fresh new manicure!
Frequently Asked Questions (FAQs)
H3: What is the easiest nail art for a complete beginner?
If you have zero experience, the absolute easiest designs are the “Skittle” manicure (painting every nail a different solid color) and minimalist bobby-pin dots. Both require no steady hand or drawing skills. You simply drop the color onto the nail or use a different polish for each finger to create an intentional, trendy aesthetic with zero artistic effort.
H3: How can I do nail art at home without professional tools?
You do not need to buy expensive dotting tools or brushes to create cute nail designs simple enough to do at home. You can easily repurpose household items. Bobby pins and toothpicks make perfect dotting and dragging tools, makeup sponges are ideal for ombres and aura effects, and standard Scotch tape can give you razor-sharp geometric lines.
H3: Why does my DIY nail art peel off the next day?
Premature peeling is almost always caused by improper nail preparation. If you don’t wipe your nails down with pure acetone or rubbing alcohol before applying your base coat, the natural oils from your skin and soap residue will prevent the polish from sticking. Additionally, forgetting to “cap the free edge” (painting the very tip of the nail) leaves the polish vulnerable to chipping.
H3: Can I get the viral chrome nail look without gel polish?
Yes! While salons use UV gel polish to create the “glazed donut” chrome finish, you can fake it at home with regular polish. Apply your regular glossy topcoat, wait until it is almost dry but still slightly tacky to the touch, and vigorously rub loose chrome powder or cosmetic highlighter over the nail using a cheap sponge eyeshadow applicator. Seal it immediately with a water-based topcoat.
H3: How long should I wait between coats of nail polish when doing art?
Patience is key for DIY nail art. You should wait at least 2 to 3 minutes between each thin layer of polish. If you apply your next coat or attempt to add nail art while the base is still wet, you risk dragging the bottom color, creating smudges, or causing tiny air bubbles to form trapped under the surface of the polish.