There is an undeniable magic to medium-length hair. Sitting perfectly between the collarbone and the chest, it is the absolute “sweet spot” for styling. It carries enough weight to hold an elegant shape, yet it’s light enough to achieve gravity-defying, bouncy volume. However, anyone who has tried to recreate a salon-quality finish at home knows that getting that flawless blowout medium length hair deserves can often feel like an exhausting arm workout with mediocre results. You might start with high hopes, only to end up with flat roots, frizzy ends, or curls that drop within the hour.
The problem rarely lies in your hair type; more often than not, it comes down to skipping foundational prep steps or using the wrong tools for this specific length. A truly long-lasting blowout requires a strategic approach from the moment you step into the shower to the final blast of hairspray. In this guide, we are diving deep into the exact methods, tools, and industry-secret hacks to master this technique from your own vanity. Whether you are aiming for a sleek modern finish or pairing your big, bouncy hair with McBling outfits that bring Y2K back to life, these 12 techniques will transform your styling routine forever.
1. Master the Prep: The Foundation of a Lasting Blowout
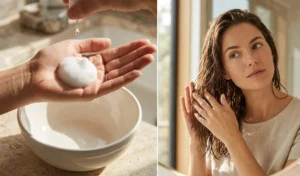
If your blowout falls flat after just two hours, the sabotage likely happened in the shower. Hair that is weighed down by heavy, silicone-based conditioners or residual product buildup simply cannot hold volume, no matter how much heat you apply. Prepping the hair correctly creates a lightweight, clean canvas that responds instantly to tension and heat.
To create the ultimate foundation, you need to rethink your washing strategy. Voluminous, medium-length hair requires a delicate balance of moisture and aggressive cleansing at the root level. By manipulating how and when you apply your shower products, you can actually train your hair to stand taller at the scalp while remaining silky and manageable at the ends.
The reverse washing method is an absolute game-changer for those with fine or easily weighed-down hair. Instead of shampooing first, you apply your conditioner to the mid-lengths and ends before anything else. You let it sit for a few minutes to hydrate the older, more fragile parts of your hair, and then you apply your shampoo directly to the roots.
When you rinse everything out simultaneously, the shampoo gently washes away the excess heavy oils from the conditioner without stripping the moisture entirely. This leaves the roots squeaky clean and ready for maximum lift, ensuring your blowout isn’t fighting against the heavy residue of moisturizing agents.
Over time, dry shampoo, hairspray, and natural scalp oils create a film on the scalp that suffocates the roots. Using an exfoliating scalp rinse or a clarifying shampoo once a week is vital for a bouncy blowout. According to hair care experts at the American Academy of Dermatology, keeping the scalp free of buildup is essential for both hair health and structural volume.
A clarifying treatment removes these stubborn barriers, giving your roots the physical freedom to lift. When you follow up with your round brush later, the clean hair cuticles will grip the bristles much better, allowing for the precise tension needed to create a long-lasting shape.
It might sound like torture, but rinsing your hair with freezing cold water right before exiting the shower is a stylist’s secret weapon. Hot water opens up the hair cuticles, allowing cleansers and conditioners to penetrate, but if left open, those cuticles will cause massive frizz the second your blow dryer hits them.
A final blast of cold water immediately shocks the cuticles closed, locking in the moisture from your conditioner and creating a naturally smooth, reflective surface. This step alone cuts down drying time and leaves you with that sought-after “glass hair” finish before you even pick up a styling tool.

2. Cocktailing Your Products Like a Pro
Applying a single styling product and hoping for the best is a common mistake. Professional stylists rarely rely on just one formula; instead, they “cocktail” or layer products to address multiple needs simultaneously. Medium-length hair usually requires root lift, mid-shaft hydration, and end-protection, which cannot be achieved with a solitary spray.
Understanding how products interact with damp hair and heat is crucial. The goal is to build an invisible scaffolding around each hair strand that holds the shape of the blowout while actively fighting off environmental factors like humidity and friction.
For those balmy days or tropical vacations, humidity is the ultimate enemy of a fresh blowout. To combat this, mix a golf-ball-sized amount of volumizing mousse with a single pump of a targeted humidity-blocking serum in your hands before applying. The mousse provides the structural memory, while the serum acts as a raincoat for your hair.
Apply this cocktail primarily to the roots and mid-lengths, combing it through evenly. This specific combination ensures that even when you step outside in the heat, perhaps rocking one of your favorite Y2K 2000s summer fashion staples, your hair will remain completely unbothered and perfectly styled.
A critical error many make is spraying heat protectant onto soaking wet hair immediately after getting out of the shower. When hair is dripping wet, the water literally dilutes the active ingredients in your heat protectant, rendering it almost entirely useless by the time you apply hot tools.
Always wait until your hair is thoroughly towel-dried (ideally using a microfiber towel to prevent friction) before applying your thermal sprays. The hair should be damp, not wet, allowing the product to fully absorb into the hair shaft and form a genuine protective barrier against the intense heat of your dryer.
3. The Classic Round Brush & Concentrator Nozzle Tag-Team
The traditional round brush and blow dryer combination is the gold standard for a reason. It offers unparalleled control over the hair’s tension and direction. However, handling a brush in one hand and a heavy dryer in the other requires a specific technique to avoid tangling your medium-length layers or exhausting your arms.
The secret to mastering this classic duo is utilizing the concentrator nozzle. This attachment focuses the airflow directly onto the section of hair you are working on, rather than blowing the surrounding hair into a frizzy mess. Paired with a ceramic or boar-bristle round brush, it is the ultimate tool for a sleek, bouncy finish.
Never, under any circumstances, take a round brush to soaking wet hair. Wet hair is incredibly fragile and highly elastic, meaning pulling it with a round brush will cause severe breakage and stretching. Furthermore, trying to style wet hair takes twice as long and results in a limp finish.
Instead, flip your head upside down and rough-dry your hair using just your fingers and the blow dryer until it is exactly 80% dry. This removes the bulk of the moisture and adds massive natural volume to the roots. You should only introduce the round brush for the final 20% of the drying process to smooth the cuticles and bend the ends.
Frizz at the top of the head is usually caused by a lack of tension during the drying process. To fix this, take a section of hair, place the round brush underneath it right at the scalp, and pull the hair completely taut straight up toward the ceiling.
Keep the hair tightly wrapped over the bristles and aim the dryer’s nozzle directly at the root area. The tension combined with targeted heat smooths down the cuticle perfectly, eliminating flyaways and creating a solid, lifted base that will support the volume of your medium-length layers all day long.
Heat changes the shape of the hair, but cold is what actually sets it in place. Many people skip the “cool shot” button on their dryer, missing out on the most important step for longevity. Once a section of hair is fully dry and wrapped around the round brush, do not immediately unravel it.
Instead, keep the brush in place, holding the tension, and blast that section with cold air for a full 5 to 10 seconds. This rapidly cools down the internal bonds of the hair strand, “locking” the bouncy C-curve shape into memory so it doesn’t fall flat the minute you walk out the door.

4. The Y2K Supermodel Velcro Roller Set
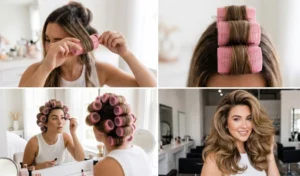
If there is one technique that defines the ultimate bouncy blowout, it is the velcro roller set. Heavily popularized in the late 90s and early 2000s, this method is experiencing a massive revival because it delivers that iconic, larger-than-life supermodel volume that hot tools alone simply cannot achieve.
Velcro rollers are particularly effective for medium-length hair because the hair is long enough to wrap securely around jumbo rollers, but not so heavy that the weight drags the volume down. They act as a cooling rack for your hair, setting the style with minimal effort while you do your makeup or pick out your outfit.
The magic of velcro rollers lies entirely in temperature timing. You cannot put a roller into cold, dry hair and expect a result. The hair must be rolled the exact second it comes off your round brush or curling iron, while the strands are still burning hot to the touch.
Working section by section, heat the hair, immediately wrap it tightly around the velcro roller starting from the ends, and roll it all the way down to the scalp. Pin it securely with a metal duckbill clip. As the hair cools down from its heated state while wrapped in this circular shape, it permanently memorizes that massive volume and bounce.
For that quintessential Y2K top-heavy volume, placement is everything. The most critical rollers are the ones placed at the very top of your head. Create a “mohawk” section by parting the hair right above both eyebrows and gathering the hair in the center of your crown.
Divide this mohawk into three distinct horizontal sections. Pull each section straight up towards the ceiling, heat it thoroughly, and roll the velcro roller completely backward, away from your face. When you take these out an hour later, you will have an incredible, swooping root lift that beautifully frames the face and cascades into your medium layers.
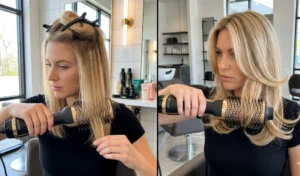
5. The Viral Hot Air Brush Method (The One-Step Blowout)
For those who find the traditional round brush and dryer coordination too difficult, the hot air brush (often called a blow-dryer brush) has revolutionized at-home styling. Combining the heat of a dryer with the shape of an oval brush, it allows you to dry, smooth, and volumize with just one hand.
However, because these tools have large, bulky barrels, using them incorrectly on medium-length hair can lead to tangles, heat damage, or a style that looks more triangular than bouncy. Proper sectioning and specific wrist movements are required to get a professional result.
Because hot air brushes pull hair tightly into their bristles, taking sections that are too thick will result in damp spots and uneven volume. Medium-length hair needs to be divided into at least four distinct horizontal layers—starting from the nape of the neck and working your way up to the crown.
Clip the rest of your hair completely out of the way and work in small, manageable pieces no wider than the barrel of the brush itself. Passing the hot air brush slowly through these micro-layers ensures that every single strand is evenly dried, heated, and smoothed, preventing the dreaded “puffy” look at the bottom.
To achieve a heavily stylized, nostalgic look, you can manipulate the ends of your hair using the oval edge of the hot air brush. Instead of rolling the brush inward towards your neck for a traditional under-curl, try purposefully twisting the brush outward at the very ends of your hair.
As you reach the bottom two inches of a section, aggressively twist your wrist away from your face and hold the hot air brush there for a few seconds. This creates that structured, flipped-out flick that was wildly popular in the 2000s, adding a fun, playful texture to your medium-length cut.
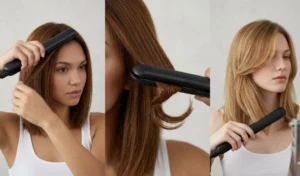
6. The Flat Iron “C-Curve” Faux Blowout
It may sound counterintuitive, but a high-quality flat iron can actually create a stunning, voluminous blowout look if you know how to wield it. This is the perfect fallback method for days when you don’t have time to wash your hair but need to revive flat, day-three hair into a polished, bouncy style.
The key to using a flat iron for volume rather than sleekness is continuous movement and avoiding clamping the roots too tightly. By manipulating the angle of the iron, you can bend the hair into soft, sweeping curves that mimic the exact shape of a round brush blowout.
To create a faux blowout, you must avoid dragging the flat iron straight down. Instead, clamp a section of dry hair near the roots and pull straight out. As you reach the mid-shaft of the hair, sharply twist your wrist to angle the flat iron at a 45-degree bevel, curving it inward towards your collarbone.
Keep the iron moving continuously through the ends without stopping, as pausing will create harsh dents in the hair. This continuous, curved motion bevels the ends perfectly underneath, creating the illusion of a voluminous, round-brushed finish in half the time.
The most important part of any blowout is how the hair frames the face. To get that sweeping, curtain-bang effect with a flat iron, you need to use a technique called over-directing. Take the front, face-framing pieces of your medium-length hair and pull them directly forward, over your nose and face.
Clamp the flat iron near the root, pull it forward toward the mirror, and as you reach the ends, dramatically curve the iron back away from your face in a “C” motion. When you let the hair drop, it will naturally swoop backward and fall perfectly into voluminous, sweeping wings on either side of your cheekbones.
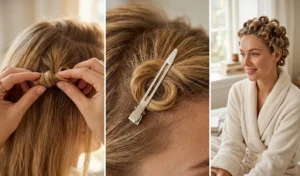
7. The Pin-Curl Setting Method for Extreme Bounce
Long before modern hot tools were invented, old Hollywood starlets relied on the pin-curl method to achieve their gravity-defying hairstyles. Today, this vintage technique remains one of the absolute best ways to get that flawless blowout medium length hair deserves. The logic is incredibly simple but highly effective: hair is molded while hot, but the actual structural memory is formed while the hair cools down. By pinning the curl to your scalp, you allow it to set in its most voluminous state.
Medium-length hair is the ideal candidate for pin curling. Because the hair isn’t overly long or heavy, the pinned sections stay securely at the root without aggressively pulling on your scalp. This method provides an intense, springy bounce that outlasts nearly any other setting technique, making it the perfect prep for long events or high-humidity days.
To execute this correctly, immediately take each hot section of hair off your round brush or curling iron and gently roll it back up toward your scalp following the same circular pattern. Once the little hair “doughnut” is sitting flat against your head, secure it using a traditional metal single-prong clip. It is crucial to use single-prong clips rather than double-prong or bobby pins, as the single slim piece of metal slides smoothly into the curl without leaving a harsh, visible crease in your freshly smoothed hair.
Leave these clips in place until your hair is entirely cold to the touch—typically around 20 to 30 minutes. You can use this downtime to apply your makeup, grab a coffee, or pick out your clothes for the day. When you finally release the clips, your hair will unfurl with a dramatic, bouncy structure that mimics a professional salon blowout perfectly.
One common mistake people make with pin curls is rolling every single section in the exact same direction, usually toward the face. While this creates a very uniform, retro pageant look, it completely defeats the purpose of a modern, breezy blowout. To keep the style looking contemporary and voluminous, you must alternate the direction of your curls as you work your way around your head.
Pin one section curled inward toward your face, and the very next section curled outward away from your face. When these alternating curls are released and brushed out together, they intertwine and push against one another. This purposeful clash of directions creates a lived-in, tousled texture with massive, multidimensional volume rather than a single, stiff block of hair.
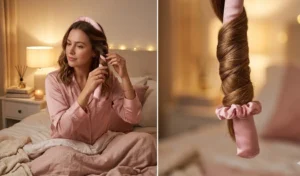
8. The Overnight Heatless Silk Rod Blowout
As we become more conscious of heat damage, the overnight heatless blowout has taken the beauty world by storm. Using a silk rod to shape your hair while you sleep is the ultimate low-maintenance hack. It protects the integrity of your hair cuticles, prevents split ends, and saves you precious styling time during busy mornings.
For medium-length hair, the silk rod is a match made in heaven. The hair is long enough to wrap multiple times around the rod to establish a gorgeous wave, but short enough that the ends won’t become a tangled, unmanageable mess by the morning. The silk material reduces friction, acting as a gentle buffer against your pillowcase.
The biggest reason heatless blowouts fail or result in a frizzy mess is that people attempt to wrap their hair while it is soaking wet. Wet hair is fragile, and wrapping it tightly around a rod will stretch the strands, leading to severe breakage. Furthermore, tightly wrapped wet hair simply will not dry completely overnight, leaving you with damp, limp roots in the morning.
To achieve a flawless heatless blowout, your hair must be 90% dry before you even touch the silk rod. You can air-dry your hair or give it a quick rough-dry with a blow dryer until it feels barely damp to the touch. This slight hint of moisture is just enough to let the hair memorize the shape of the rod overnight without harboring dampness or risking structural damage.
When securing the ends of your hair to the bottom of the silk rod, standard elastic hair ties are your worst enemy. Tight elastics will dig into the delicate ends of your hair overnight, leaving harsh, jagged dents that instantly ruin the smooth, blown-out aesthetic you are trying to achieve.
Instead, exclusively use mini silk scrunchies to tie off the ends. According to beauty experts at Cosmopolitan, silk fibers cause drastically less friction than cotton or synthetic elastics, ensuring your hair glides smoothly without catching or snapping. The soft hold of a silk scrunchie keeps your hair securely on the rod while guaranteeing a perfectly smooth, dent-free finish when you unravel it the next day.
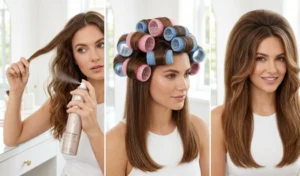
9. The Heated Roller Volume Hack
If you are short on time but still want the glamorous lift of a traditional blowout, heated rollers are the ultimate shortcut. Unlike velcro rollers, which require you to use a blow dryer to supply the heat, heated rollers come pre-warmed. They simultaneously heat and set the hair, drastically cutting down your active styling time.
Because medium-length hair holds a curl exceptionally well, heated rollers can completely transform flat, day-two hair in under fifteen minutes. They are incredibly user-friendly; once they are rolled and clipped in, the tools do all the heavy lifting while you go about your morning routine.
You do not need a head full of thirty rollers to achieve a blowout look. In fact, over-rolling medium-length hair can make it look artificially curly rather than naturally voluminous. The secret is targeted placement: you only need to use large, jumbo-sized heated rollers on the top crown section and the face-framing pieces.
By focusing the heat and lift exclusively on the top layers of your hair, you create that sought-after “root bump” that defines a luxury blowout. Leave the bottom layers of your hair completely loose, perhaps just running a smoothing brush through them. This contrast between massive crown volume and sleek, naturally falling bottom layers looks incredibly modern and effortless.
To guarantee your heated roller set lasts all day, you need to change when you apply your hairspray. Most people make the mistake of spraying their hair only after the rollers are taken out. By then, the hair is cooling down, and the spray sits heavily on the surface, often weighing the fresh volume down.
Instead, lightly mist each individual section of hair with a flexible-hold hairspray before you wrap it around the hot roller. The heat from the roller essentially “bakes” the flexible hold directly into the hair strand as it forms the curl. This creates an invisible, internal structure that locks the bounce in place for hours without feeling crunchy or stiff to the touch.
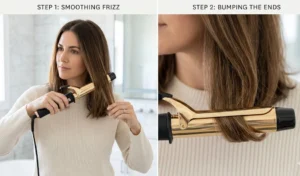
10. The Curling Iron “Bumping” Technique
There are days when wrestling with a round brush or setting a head of rollers just isn’t on the agenda. For these lazy styling days, a large-barrel curling iron can serve as a fantastic cheat code for a faux blowout. When used strategically, a curling iron can replicate the smooth, rounded ends of a brush blowout in a fraction of the time.
This technique works phenomenally well on naturally straight or chemically straightened medium-length hair that just needs a bit of movement and life injected into the ends. It gives the hair a polished, “finished” appearance that pairs perfectly with casual, sunny-day aesthetics.
The key to this method is using an oversized barrel—ideally 1.5 to 2 inches in diameter. You do not want to curl the entire length of the hair, as that will result in ringlets. Instead, run the curling iron smoothly down the hair shaft to flatten any frizz, stopping right before you reach the bottom.
Once you are at the bottom two inches of the hair, gently roll the curling iron under towards your collarbone to “bump” the ends. Hold for just three seconds and release. This simple, subtle curve at the absolute bottom of your medium-length layers beautifully mimics the classic C-curve of a traditional blowout, instantly elevating your look with zero arm fatigue.
11. Post-Blowout Finishing Touches
The work doesn’t stop the moment you turn your styling tools off. A blowout is only as good as the finishing touches you apply to it. Medium-length hair, in particular, requires a delicate balance of texturizing and smoothing products to keep the layers looking piecey and voluminous without crossing into greasy or heavy territory.
Proper finishing seals the hair cuticle against humidity, tames rogue flyaways, and injects that covetable, salon-quality shine. Skipping this step is the quickest way to let your hard work deflate within the first few hours of stepping outside.
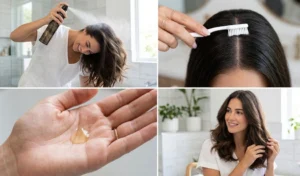
Once your hair is completely cool and fully unpinned or unrolled, flip your head entirely upside down. Take a high-quality dry texturizing spray (not dry shampoo, which can leave a white cast) and mist it directly into the roots at the nape of your neck and the crown of your head.
While your head is still flipped, use your fingertips to vigorously massage and shake out the roots. This breaks up any stiff partings and creates massive, airy volume. When you flip your head back over, your medium layers will look incredibly thick, dynamic, and full of natural movement.
Nothing ruins the sleek illusion of a fresh blowout quite like a halo of static or broken baby hairs standing straight up along your part. However, spraying hairspray directly onto the top of your head will instantly weigh down the volume you just worked so hard to build, leaving the roots looking helmet-like.
The professional workaround is the toothbrush hack. Take a clean, unused toothbrush and mist its bristles with a strong-hold hairspray. Gently lightly sweep the toothbrush over the very top layer of your hair, specifically targeting the part line and the hairline. The dense bristles catch and smooth down the tiny flyaways with pinpoint accuracy, leaving your root volume completely undisturbed.
To achieve that reflective, glass-hair shine that defines a luxury blowout, hair oil is a must. However, applying oil to medium-length hair can be incredibly risky; one drop too many, and your bouncy blowout turns into a flat, stringy mess.
The secret is “micro-oiling.” Dispense literally a single drop of a lightweight, silicone-free hair oil into your palms and rub your hands together vigorously until the oil is completely dispersed and warmed up. Gently rake your hands through your hair, starting strictly from the mid-shaft and focusing heavily on the very ends. Never let the oil get near your roots. This provides a brilliant, healthy sheen and seals split ends without compromising your volume.
12. Preserving the Blowout for Days
A flawless blowout takes time, effort, and technique, so you naturally want to make it last as long as possible. The true test of a great blowout isn’t how it looks on day one, but how well it holds up on days two and three. Extending the life of your style comes down to how you treat your hair while you are unconscious.
Friction from tossing and turning on cotton pillowcases is the number one cause of morning frizz, tangles, and flattened roots. By actively protecting your hair at night, you can wake up with bouncy, ready-to-go medium layers for days on end.
To preserve your volume and smooth ends, you need to elevate the hair away from the friction of your pillow. The best way to do this is the “pineapple” method combined with a silk wrap. Flip your head upside down and gather all your hair completely loosely at the very highest point of your head, right near your forehead.
Secure it very loosely with a silk scrunchie, and then wrap a large silk scarf around your head to encase the hair. The silk scarf acts as an impenetrable shield against friction, while the high pineapple placement ensures that your roots remain lifted overnight. When you take it down in the morning, your flawless blowout will bounce right back into place, looking just as vibrant as the moment you styled it.

Conclusion
Achieving that flawless blowout medium length hair deserves doesn’t require a professional cosmetology license or spending hours in a salon chair. It comes down to understanding your hair’s relationship with moisture, tension, and heat. By utilizing the right prep work like reverse washing, mastering the cool shot on your blow dryer, and relying on hacks like velcro rollers and silk rods, you can engineer massive, long-lasting volume right from your own vanity.
Whether you decide to rock this bouncy, glamorous look at the office or pair it flawlessly with the Top 15 Y2K Tropicalcore Outfit Ideas for 2026 on your next sunny getaway, your hair will undoubtedly be the star of the show. The key is patience, proper sectioning, and remembering that the way you let your hair cool down is just as important as how you heat it up.
Leave a comment below and let us know which of these 12 blowout techniques you are going to try first, and don’t forget to share your favorite at-home styling hacks with the community!