
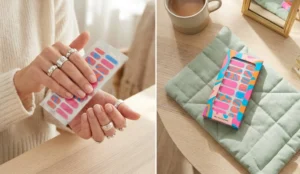
Nail polish strips have completely revolutionized the at-home manicure, offering intricate designs and vibrant colors without the dry time or mess of traditional liquid polish. However, achieving a truly flawless finish—especially when you want to create custom, multicolor looks—can sometimes feel like a frustrating challenge. Many users find themselves dealing with peeling edges, awkward sizing, or feeling stuck with the pre-set patterns straight out of the box. The good news is that with the right application techniques, you can transform these simple strips into a long-lasting, salon-quality masterpiece that looks professionally done.
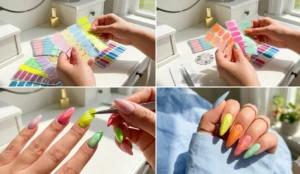
Creating a custom “Mixed Mani” is the perfect way to express your personal style, allowing you to blend different shades and patterns for a totally unique aesthetic. These vibrant, customizable nail looks are the ultimate accessory, pairing perfectly with those essential 2000s Y2K summer pieces you’ve been eyeing this season. Whether you are aiming for a nostalgic, vibrant vibe or a sleek color-blocked design, these 10 Color Street nails hacks will guide you through the precise preparation, flawless application, and creative cutting techniques needed for the perfect multicolor nail strips.
Prep & Application Hacks for a Flawless Base
Achieving a stunning multicolor design starts long before you actually place the color on your nails; it begins with how you prepare the canvas. The longevity and smooth finish of your nail polish strips depend entirely on how clean, dry, and primed your natural nails are. Skipping the prep work usually leads to premature lifting and a manicure that barely lasts through the weekend.
By treating the application process like a professional salon service, you can ensure that your multicolor nail strips adhere perfectly and look seamless. The following hacks are designed to give you the ultimate flawless base, focusing on temperature control, strategic cleaning, and precise placement techniques that make all the difference in the world.
1. The Warm-Up Trick for Ultimate Flexibility
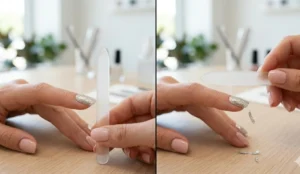
One of the biggest secrets to a smooth, wrinkle-free application is controlling the temperature of the nail polish strips before you even peel off the clear plastic cover. If the strips are too cold, they become rigid, brittle, and difficult to stretch over the natural curve of your nail bed. This stiffness often leads to tiny creases near the cuticles or edges that refuse to lay flat, instantly giving away the fact that you are wearing a DIY strip rather than a professional polish job.
To solve this, use the “Warm-Up Trick” to maximize the flexibility of the polish. Simply sit on the unopened package for about five to ten minutes, or hold the sleeve tightly between your hands to transfer your body heat. You can also place them on a warm heating pad for a few moments. Warming the strips makes the polish incredibly pliable and stretchier, allowing you to gently pull and mold the strip to fit your exact nail shape seamlessly without tearing the delicate material.
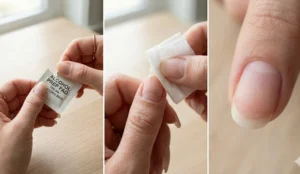
2. The Double Alcohol Wipe Method
Every expert nail technician knows that natural oils are the ultimate enemy of any manicure, and this is especially true when applying dry nail polish strips. Throughout the day, your skin produces oils, and washing your hands with moisturizing soaps can leave a hidden residue on your nail plates. If you apply a strip over this invisible barrier, the adhesive won’t bond to the keratin of your nail, resulting in edges that lift within a matter of hours.
To combat this, you need to employ the Double Alcohol Wipe Method. First, use a standard alcohol prep pad to thoroughly wipe down all of your natural nails before you even start sizing your strips. Then, right before you are ready to apply a specific strip to a specific finger, take a fresh alcohol pad and wipe that single nail one more time. This secondary wipe ensures that any stray oils transferred from your fingertips during the sizing process are completely eradicated, guaranteeing maximum adhesion for your multicolor nail strips.
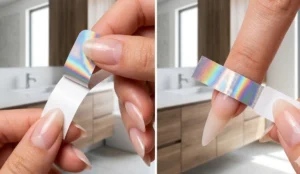
3. The Anchor Technique for Perfect Placement
A major struggle when applying Color Street strips is holding onto the sticky side while trying to align it perfectly with your cuticle line. The moment your fingers touch the adhesive backing, you transfer oils and reduce the stickiness of the product. Furthermore, holding the flimsy strip by its edges makes it incredibly difficult to see exactly where you are placing it, often resulting in crooked applications that need to be peeled up and restuck, which weakens the hold.
The “Anchor Technique” completely eliminates this frustrating guesswork. When you peel the strip off its paper backing, do not remove the paper entirely. Instead, peel the strip exactly halfway down, leaving the bottom half stuck to the paper. You can now use the sturdy paper backing as a handle—or an “anchor”—giving you ultimate control and visibility. You can hover the exposed edge of the strip directly over your cuticle, align it flawlessly, and press it down before sliding the rest of the paper away, keeping the adhesive completely untouched by your fingers.
4. The Rubber Cuticle Pusher Seal
Many people try to smooth out their nail strips using the pad of their thumb, but human skin is too soft to create the firm, airtight seal needed along the side grooves of the nail. When you rely solely on your fingers, you inevitably leave microscopic air pockets around the edges. These tiny gaps are where water and hair get caught when you shower, slowly lifting the strip away from the nail bed and ruining your beautiful custom design.
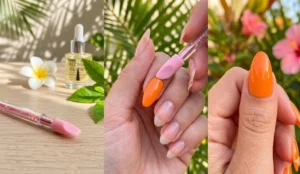
For a truly professional finish, invest in a soft, rubber or silicone cuticle pusher. After you have placed the strip using the Anchor Technique, take the rubber tip and firmly iron out the polish, pushing from the center of the nail outward. Press the rubber tip firmly into the side walls and the cuticle line. This tool provides the perfect amount of firm, frictionless pressure to seal the edges completely flat. For more on maintaining the health of your nail beds during this process, checking out proper cuticle care routines from dermatologists is highly recommended, as healthy cuticles create the best border for your strips.
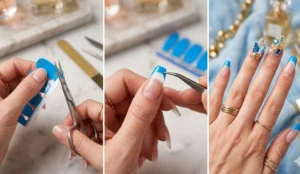
5. The 90-Degree Downward File Strategy
The way you remove the excess polish hanging off the tip of your nail can make or break your entire manicure. The instinct for most beginners is to take a nail file and vigorously saw back and forth across the edge to tear the strip away. This side-to-side motion actually stretches the polish horizontally and causes microscopic tears. As the polish fully cures and dries over the next hour, it will shrink back, leaving you with annoying tip wear and exposed natural nail edges on day one.
Instead, you must adopt the 90-Degree Downward File Strategy. Once the strip is firmly sealed to your nail, fold the excess material straight over the edge. Take your glass or standard emery board file and hold it completely perpendicular (at a 90-degree angle) to the nail. Gently file straight down in one direction only. Do not pull up or saw back and forth. This clean, downward slicing motion seamlessly severs the excess polish exactly at the edge of your nail, preventing any future shrinkage or jagged, frayed tips in your multicolor design.
Creative Hacks for Custom Multicolor Designs
Now that you have mastered the precise preparation and application techniques to ensure your polish stays firmly attached, it is time to unleash your creativity. The true magic of dry nail polish strips lies in their versatility. Because you aren’t dealing with wet, messy liquids that bleed together, you can treat the strips almost like crafting material, cutting and piecing them together to form intricate, personalized nail art.
Creating a custom multicolor design is the perfect way to make your manicure uniquely yours. By mixing solids, glitters, and patterns from different sets, you can easily replicate high-end salon trends from the comfort of your own home. The following hacks will show you exactly how to manipulate your nail strips using basic household tools to achieve sharp, flawless, and highly creative color combinations.
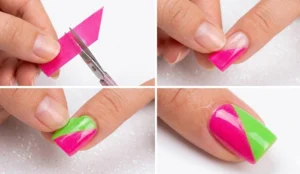
6. The Diagonal Color Blocking Cut
Color blocking is a massive trend in both fashion and beauty, featuring bold, contrasting geometric shapes that instantly catch the eye. Trying to paint clean, straight diagonal lines with standard liquid nail polish requires incredibly steady hands and messy striping tape. However, with dry nail strips, achieving this modern, edgy look is as simple as making a single snip with a pair of scissors.
To execute the Diagonal Color Blocking Cut flawlessly, leave the nail strips fully attached to their paper backings. Take two contrasting colors and use a sharp pair of cosmetic scissors to cut them at a 45-degree angle. Apply the first angled half to the bottom of your nail, smoothing it out completely. Then, take the contrasting angled half, line up the straight cut exactly against the edge of the first strip, and press it down. This creates a seamless, razor-sharp two-tone nail that looks incredibly complex but takes only seconds to achieve. For more inspiration on modern geometric nail trends, Harper’s Bazaar regularly showcases runway-inspired color blocking that you can easily replicate using this exact hack.
7. Creating Faux French Tips from Leftovers
The French manicure has made a massive resurgence, but the modern take ditches the traditional sheer pink and white for vibrant, multicolor tips. Buying specialized French tip strip sets can be expensive, and they often limit you to standard color combinations. Fortunately, you likely already have everything you need to create this look sitting in your leftover strip pile.
If you examine an unused nail strip, you will notice that the bottom edge closest to the cuticle is perfectly curved. To create a Faux French Tip, simply take a vibrantly colored leftover strip, leave it on the backing, and snip off that bottom curved edge, leaving about a quarter-inch of polish. Peel it off and apply that curved piece directly over the tip of a bare nail or a contrasting solid base color. This hack creates a flawless, rainbow-tipped manicure that pairs beautifully with bold, summery aesthetics, like these 20 Y2K beach outfit ideas you can actually wear. Finish with a clear topcoat to seal the edge.
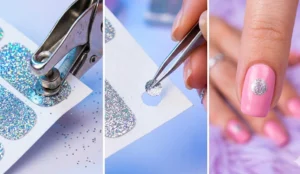
8. The Hole Punch Polka Dot Trick
If you love patterned nails but don’t want to commit an entire manicure to a specific print, creating custom accents is the way to go. Polka dots are universally flattering and add a playful, retro touch to any set, but dotting tools and wet polish can lead to smudging, uneven circles, and frustrating dry times. Nail polish strips offer a brilliant, mess-free alternative for custom dotting.
For this trick, grab a standard office hole punch from your desk. Take a solid or glittery nail strip—keeping the clear top film and paper backing attached—and punch several holes directly into the strip. You will be left with perfect, tiny circles of dry nail polish. Gently use tweezers to separate the polish from the paper backing, and stick the dots onto a nail that already has a solid base color applied. Press them flat with your rubber cuticle pusher, and you instantly have a flawless, multicolor polka-dot accent nail without a single drop of wet polish.
9. The Scrap “Skittle Mani” Mix-and-Match
The “Skittle Mani” is a fun, vibrant trend where every single finger is painted a completely different color, resembling a handful of candy. While achieving this with traditional polish requires buying five separate bottles of expensive lacquer, it is the absolute perfect solution for anyone who uses nail strips. Every time you finish a standard manicure, you are inevitably left with a few odd-sized strips that don’t make up a full set.
Instead of throwing those random leftovers away, curate them to create a deliberate, mismatched masterpiece. The secret to making a Skittle Mani look chic rather than chaotic is keeping the finishes cohesive. For example, mix five different pastel solids, or alternate five different neon glitters. This incredibly fun, multicolor look is the ultimate accessory to compliment heavily nostalgic fashion, making it the ideal aesthetic companion for these 11 McBling outfits that bring Y2K back to life.
The Ultimate Longevity Hack
If you are going to invest time into creating beautiful, custom multicolor designs using the creative hacks above, you need to ensure you actually have leftover strips that are usable. The biggest complaint users have about 100% real nail polish strips is that once the vacuum-sealed package is opened, the polish begins to cure and dry out almost immediately.
If you leave your leftover strips sitting on your counter overnight, they will become brittle, hard, and completely useless for future mix-and-match manicures. To become a true master of the custom multicolor set, you need to know exactly how to preserve your stash so you can pull from a wide variety of colors and textures whenever inspiration strikes.
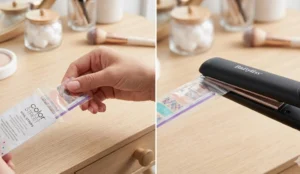
10. The Flat Iron Reseal for Future Mixes
Because nail polish strips are made of actual polish, they require an airtight environment to maintain their flexibility and stickiness. Simply folding the top of the plastic sleeve over or using a paperclip will not keep the air out; the strips will still cure within 24 hours. To save your scraps for those stunning Skittle Manis and color-blocked designs, you have to recreate the original factory seal.
Enter the Flat Iron Reseal hack. Once you have finished your manicure, immediately place all unused strips back into their original clear plastic sleeve. Turn on your hair straightener (or a dedicated craft sealing iron) to a medium heat setting. Press the open end of the plastic sleeve between the hot plates of the iron for exactly two to three seconds. The heat will melt the plastic together, creating a perfectly airtight seal that stops the curing process in its tracks. Your strips will remain soft, stretchy, and ready to be cut into unique shapes for months to come.
Conclusion
Achieving a flawless, custom multicolor manicure at home doesn’t require an expensive trip to the salon or an intimidating array of dotting tools, striping tapes, and wet lacquers. When you understand the unique properties of dry nail polish strips, you unlock a completely new world of DIY nail art. It all comes down to controlling the temperature, meticulously prepping the nail bed to banish oils, and using everyday household tools to create sharp, imaginative shapes.
By utilizing the warm-up trick and the double alcohol wipe method, your base will be incredibly secure, acting as the perfect foundation for your diagonal cuts, faux French tips, and hole-punch patterns. The flat iron resealing hack ensures that your collection of vibrant colors and glitters will always be ready for your next creative session. Now it is your turn to start experimenting! What is your absolute favorite Color Street hack, and which two contrasting colors are you most excited to mix together for your next custom set? Drop your thoughts and color combo ideas in the comments below!